
Tokyo Disney Vacation Packages: Step-by-Step Booking Guide
“Take a step, step again
It is all that I can to do
The next right thing”
Planning your Tokyo Disney Vacation Package is one thing. Actually booking it is another.
Once you know which package, hotel, and room you want, everything comes down to booking day — and that’s where things can feel a bit stressful if you don’t know what to expect.
When I booked mine, I quickly realized this isn’t just a simple refresh-and-book situation. There’s a set release time, a waiting room, and once you’re in, options can disappear quickly — especially if you’re aiming for something specific. That’s why preparation makes such a big difference. You know what they say, practice makes perfect. So…
In this guide, I’ll walk you through the full booking process step by step — what to prepare beforehand, where to click, and what to expect once bookings open, so you can go in feeling ready instead of overwhelmed.
If you’re still deciding which package or hotel to choose, I break that down in my other guide.
Ready? Here’s your step-by-step guide on how to book the Vacation Package of your dreams for Tokyo Disney
Before we begin: the Tokyo Disney booking website
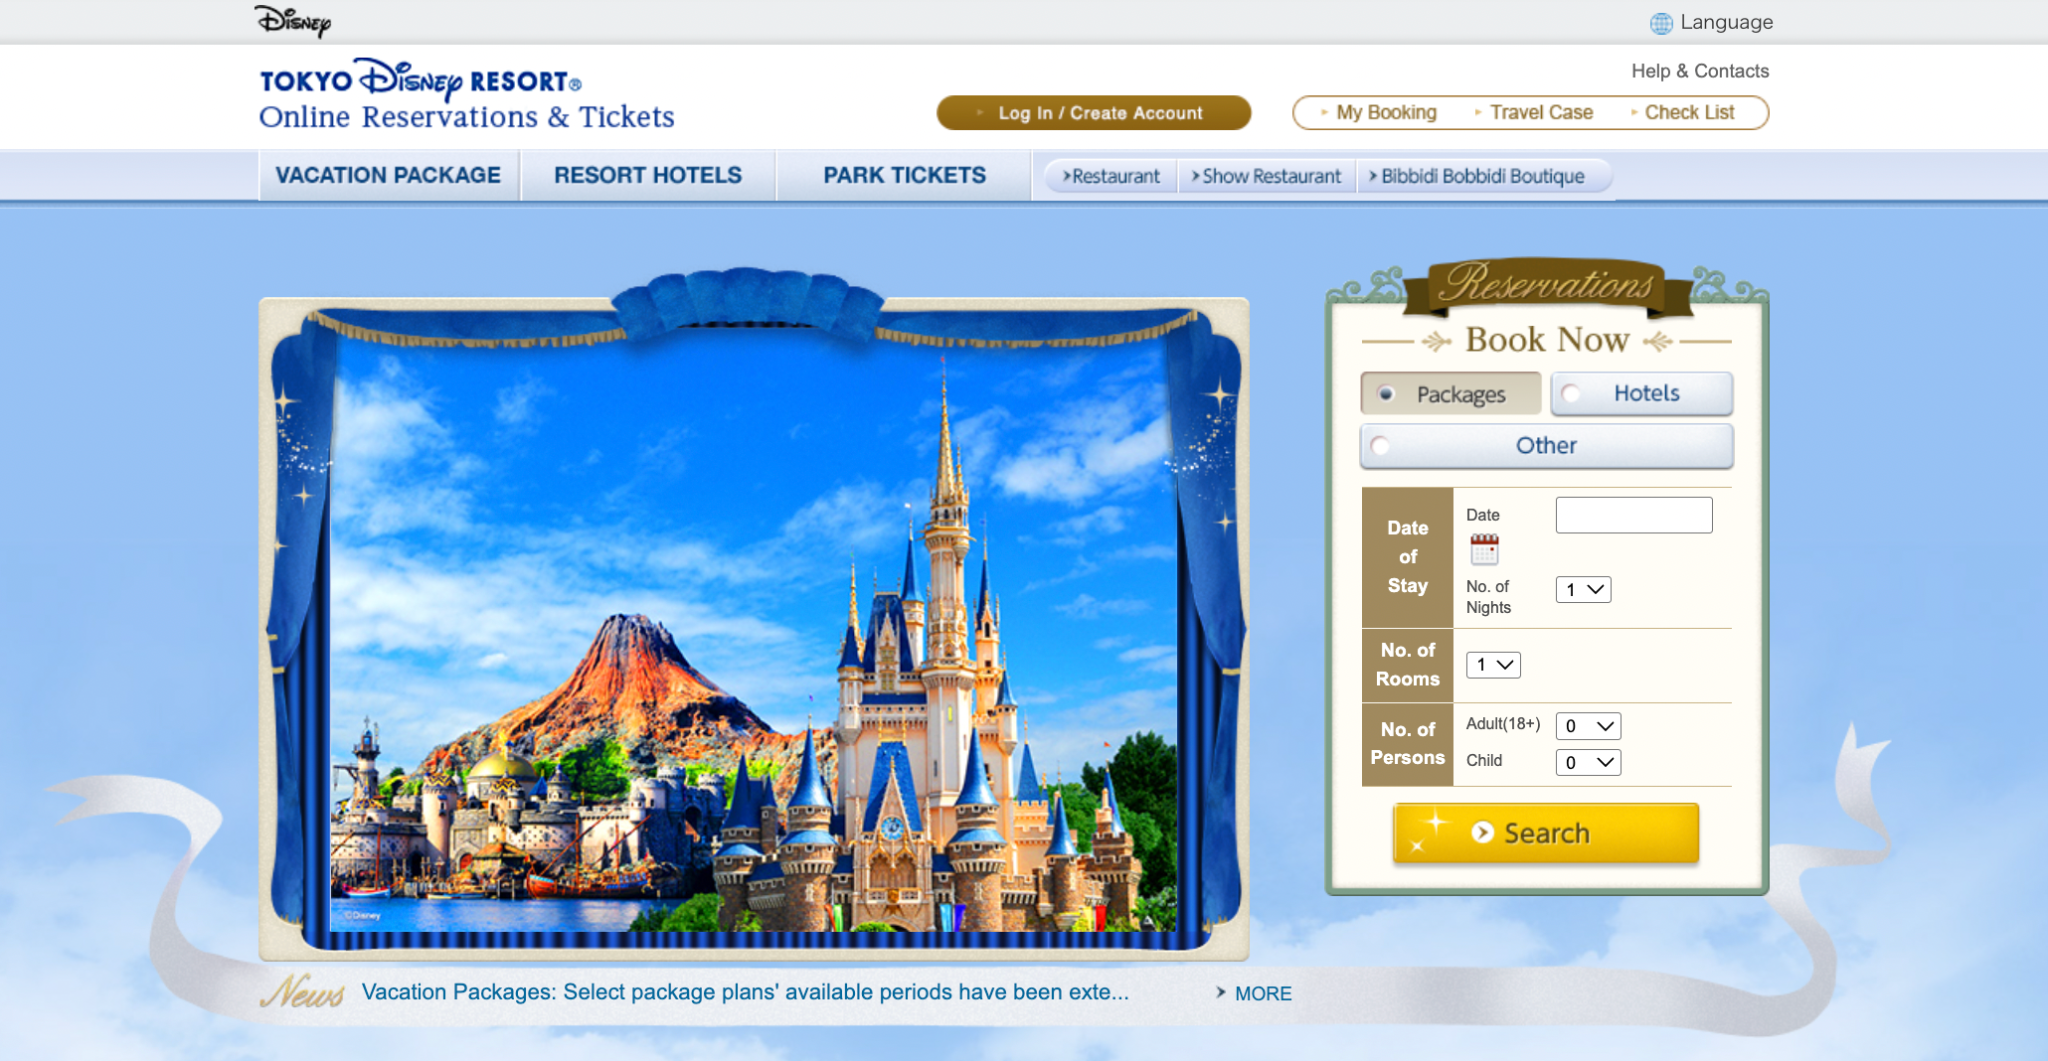
To book a Tokyo Disney Vacation Package, you’ll be using the official Tokyo Disney Resort booking website:
https://reserve.tokyodisneyresort.jp/en/
This is where you’ll search for Vacation Packages, select your hotel and room, and complete your booking.
When you open the homepage, you’ll see several different booking options and ways to get to the Vacation Packages. At first glance, it can feel a bit confusing — especially if you’re not yet familiar with the layout. For Vacation Packages, you can simply use the main booking menu on the homepage and make sure the “Packages” section is selected (like below). This is the quickest way to get started.
Personal tip:
Before booking day, I’d really recommend opening the website a few times in advance and getting familiar with the homepage. That way, when bookings go live, you already know where to go and you’re not wasting time trying to figure things out. It might seem like a small step, but it makes a big difference once you’re actually booking.
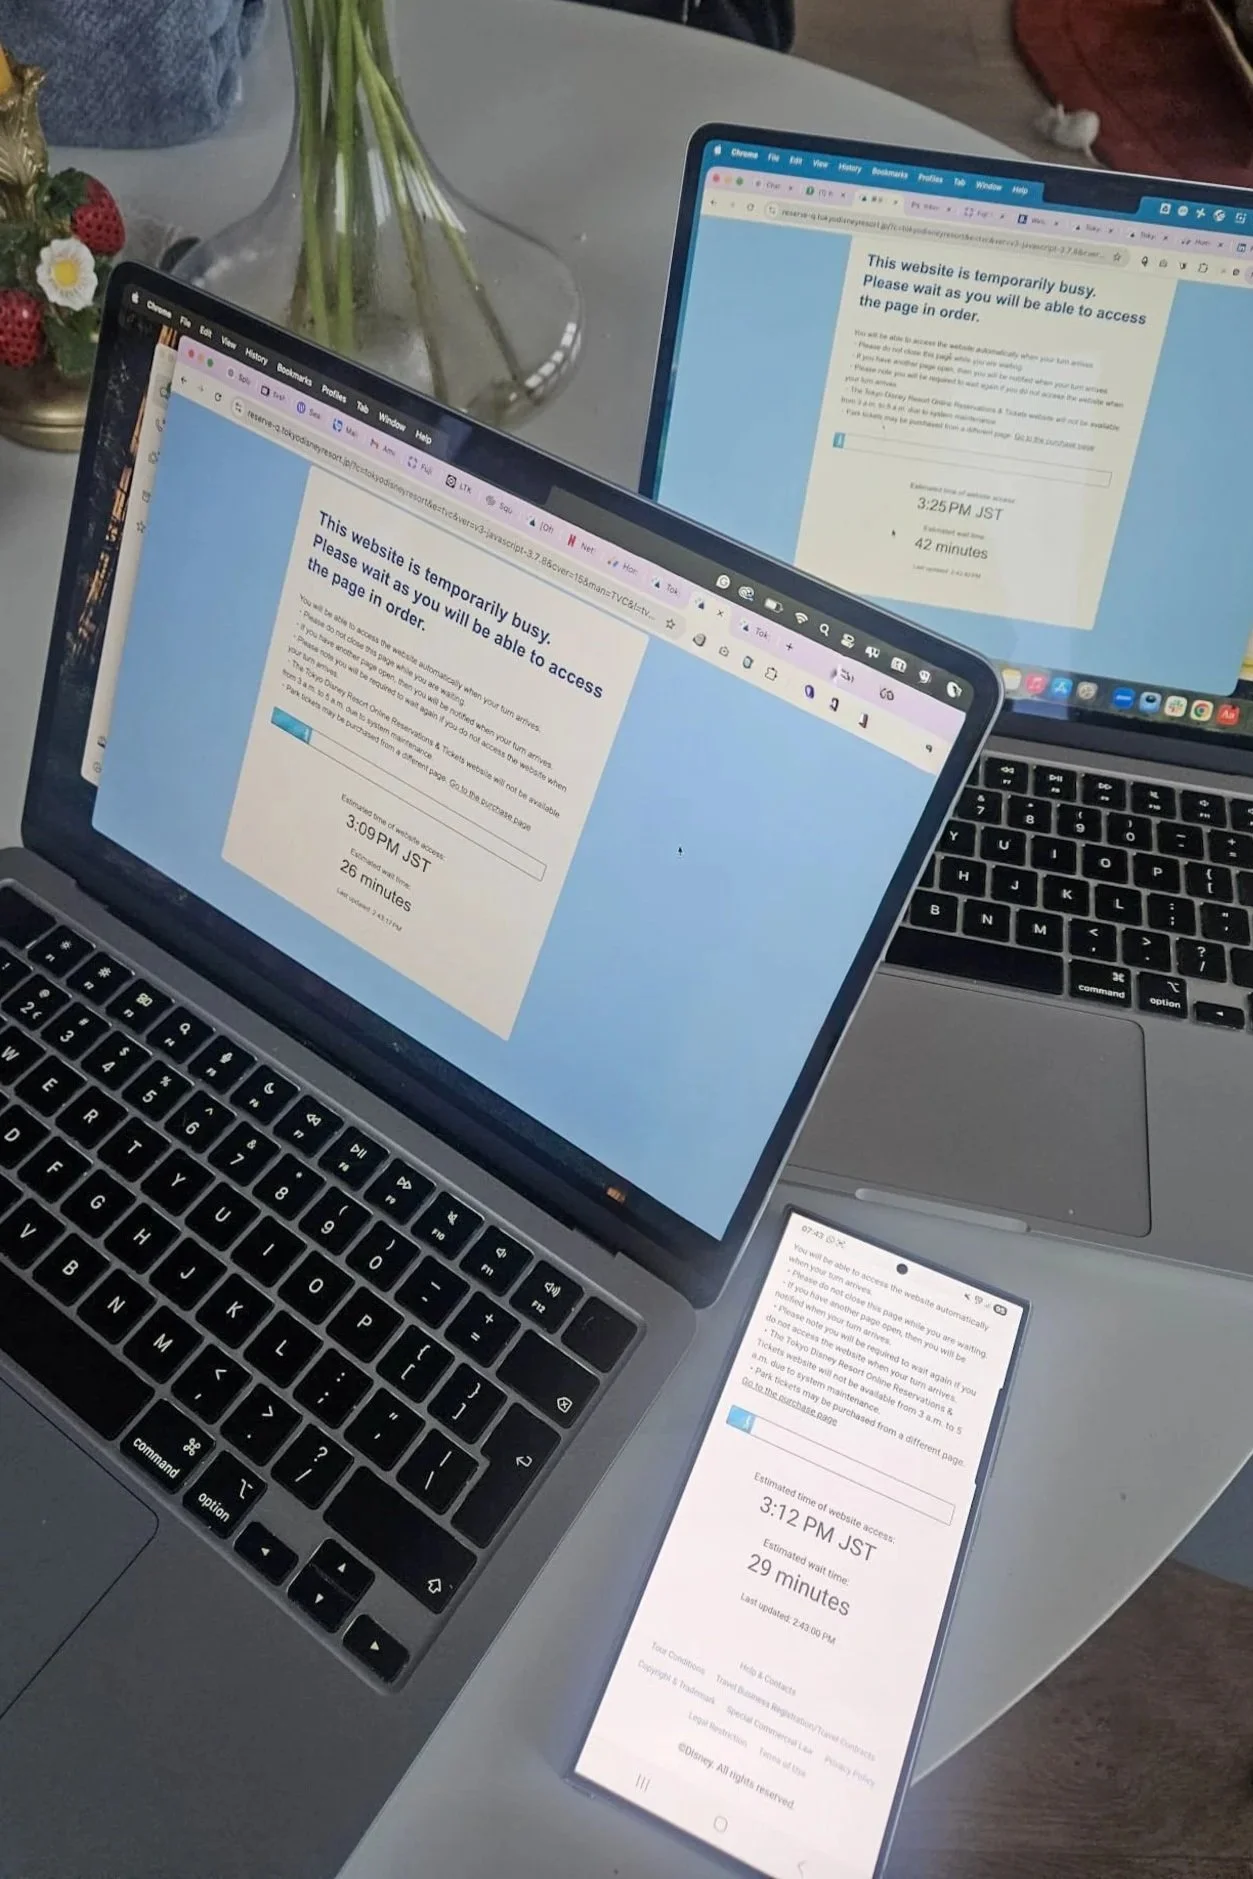
Step 1. The waiting room
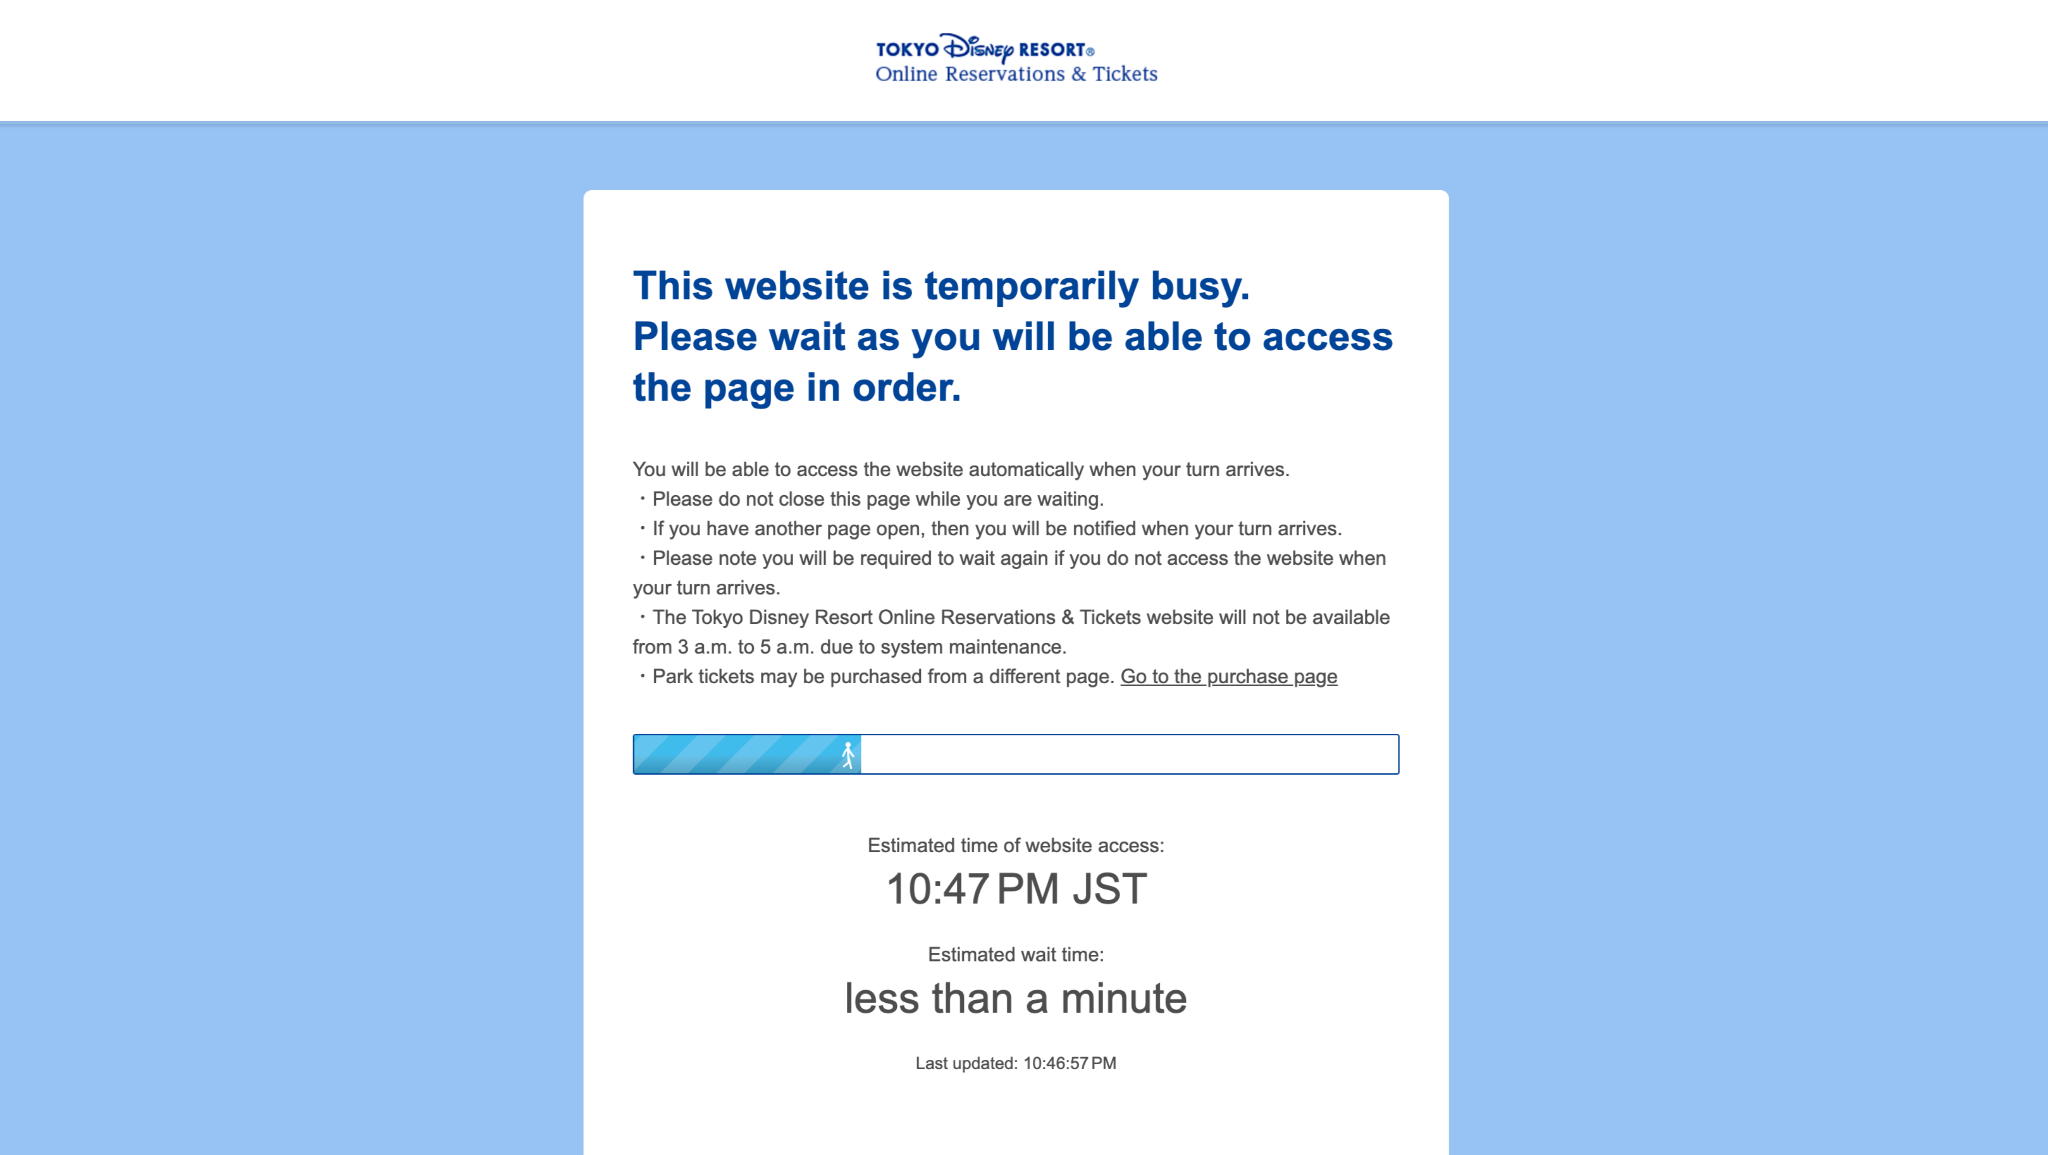
When booking opens, you might expect to just go to the website, refresh the page, and start booking. In reality, it doesn’t quite work like that. Instead, you’ll most likely be placed in a waiting room before you can access the booking system. This is something I wasn’t fully prepared for. I assumed it would be more of a refresh situation, but instead I ended up waiting in a queue before even getting access to the booking page.
Personal tip:
I’d recommend being on the website about one hour before booking opens. Vacation Packages usually go on sale around 3:00 PM (Japan time), so make sure you check what time that is in your local time zone and plan accordingly. I made the mistake of joining only about 30 minutes before, and ended up accessing the site about an hour later — which meant I got in around 30 minutes after bookings had already opened. By that time, some of the most popular options were already gone.
Before you start: It’s really important you don’t refresh when you see the loading screen. It might take some time to load between steps but if you do refresh, you’ll have to start over.
Also, if you take too long the site might freeze and you will be forced to refresh. You don’t want this to happen so really trust me when I say — write everything down ahead of time including your preferred time slots, especially if you’re going for popular choices.
Lastly, If you notice some options aren’t visible anymore, that means they are sold out. Have a second option ready, just in case.
Step 2. Fill in your stay details
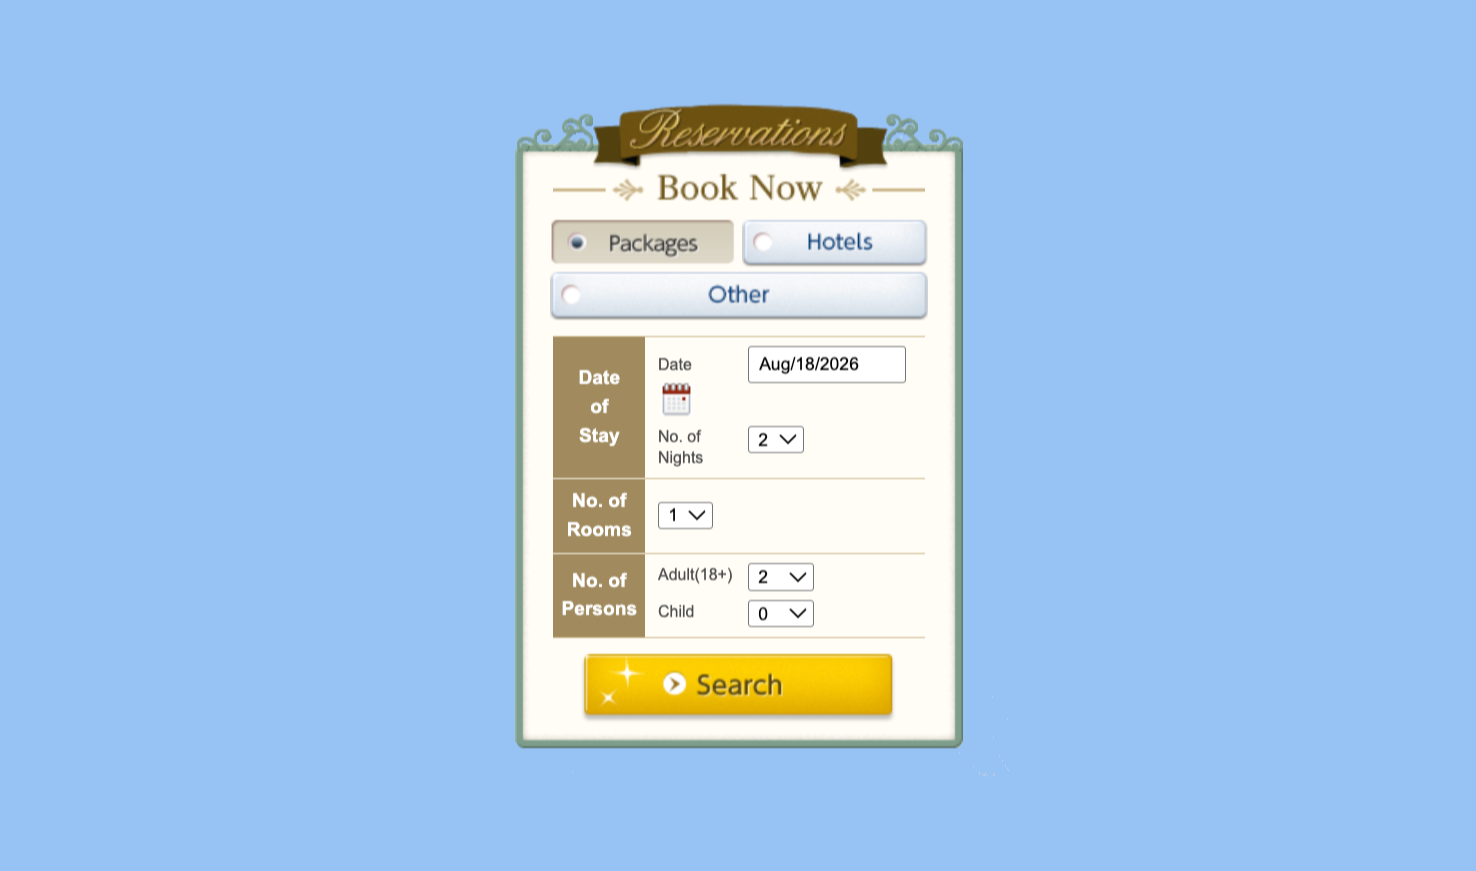
Once you’re through the waiting room, you’ll be taken to the homepage (same page as you saw in the beginning). This is where you’ll start your actual search.
Here, you’ll need to fill in:
your travel dates
the number of nights
the number of rooms
and how many people you’re travelling with
Make sure everything is correct before continuing, as this will determine which Vacation Packages are shown to you.
Personal tip:
Write everything down in advance. Booking can feel a bit stressful, and depending on where you’re located, it might be very early in the morning (or late at night). It’s not the moment to double-check dates or think about how many nights you want to stay. Having everything written down means you can simply follow your plan and fill in the details without second-guessing yourself — and avoid mistakes like selecting the wrong dates or number of people. This is not the time to forget one of your kids lol.
Step 4. Select your vacation package
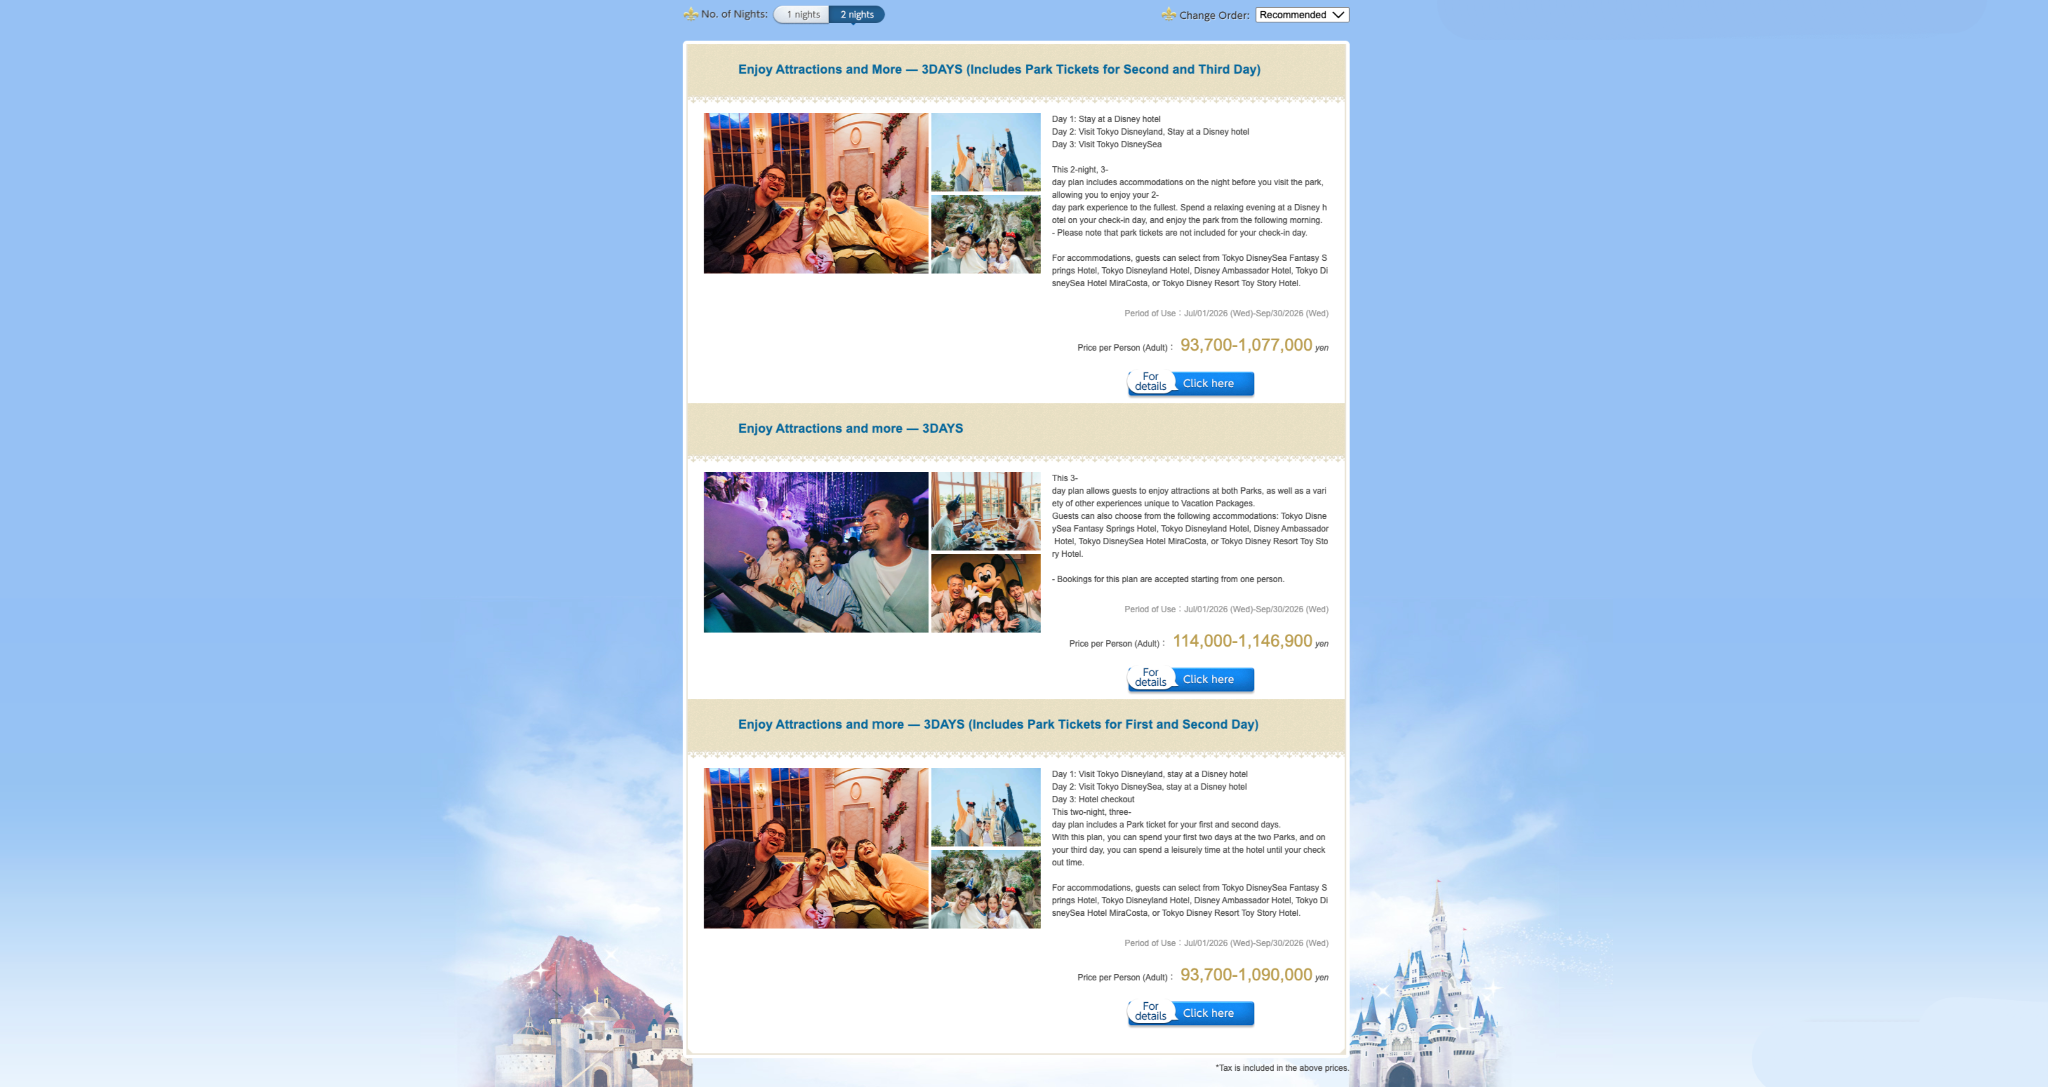
Once your search results load, you’ll see a list of available Vacation Packages. This is where you’ll choose between the different package types:
2-day park access (Park tickets for first and second day)
2-day park access (Park tickets for second and third day)
3-day park access
If you’re not sure which one to choose, I break down the differences in more detail here. At this stage, simply select the option you want and click “Click here” to continue.
Step 5. Confirm your vacation package
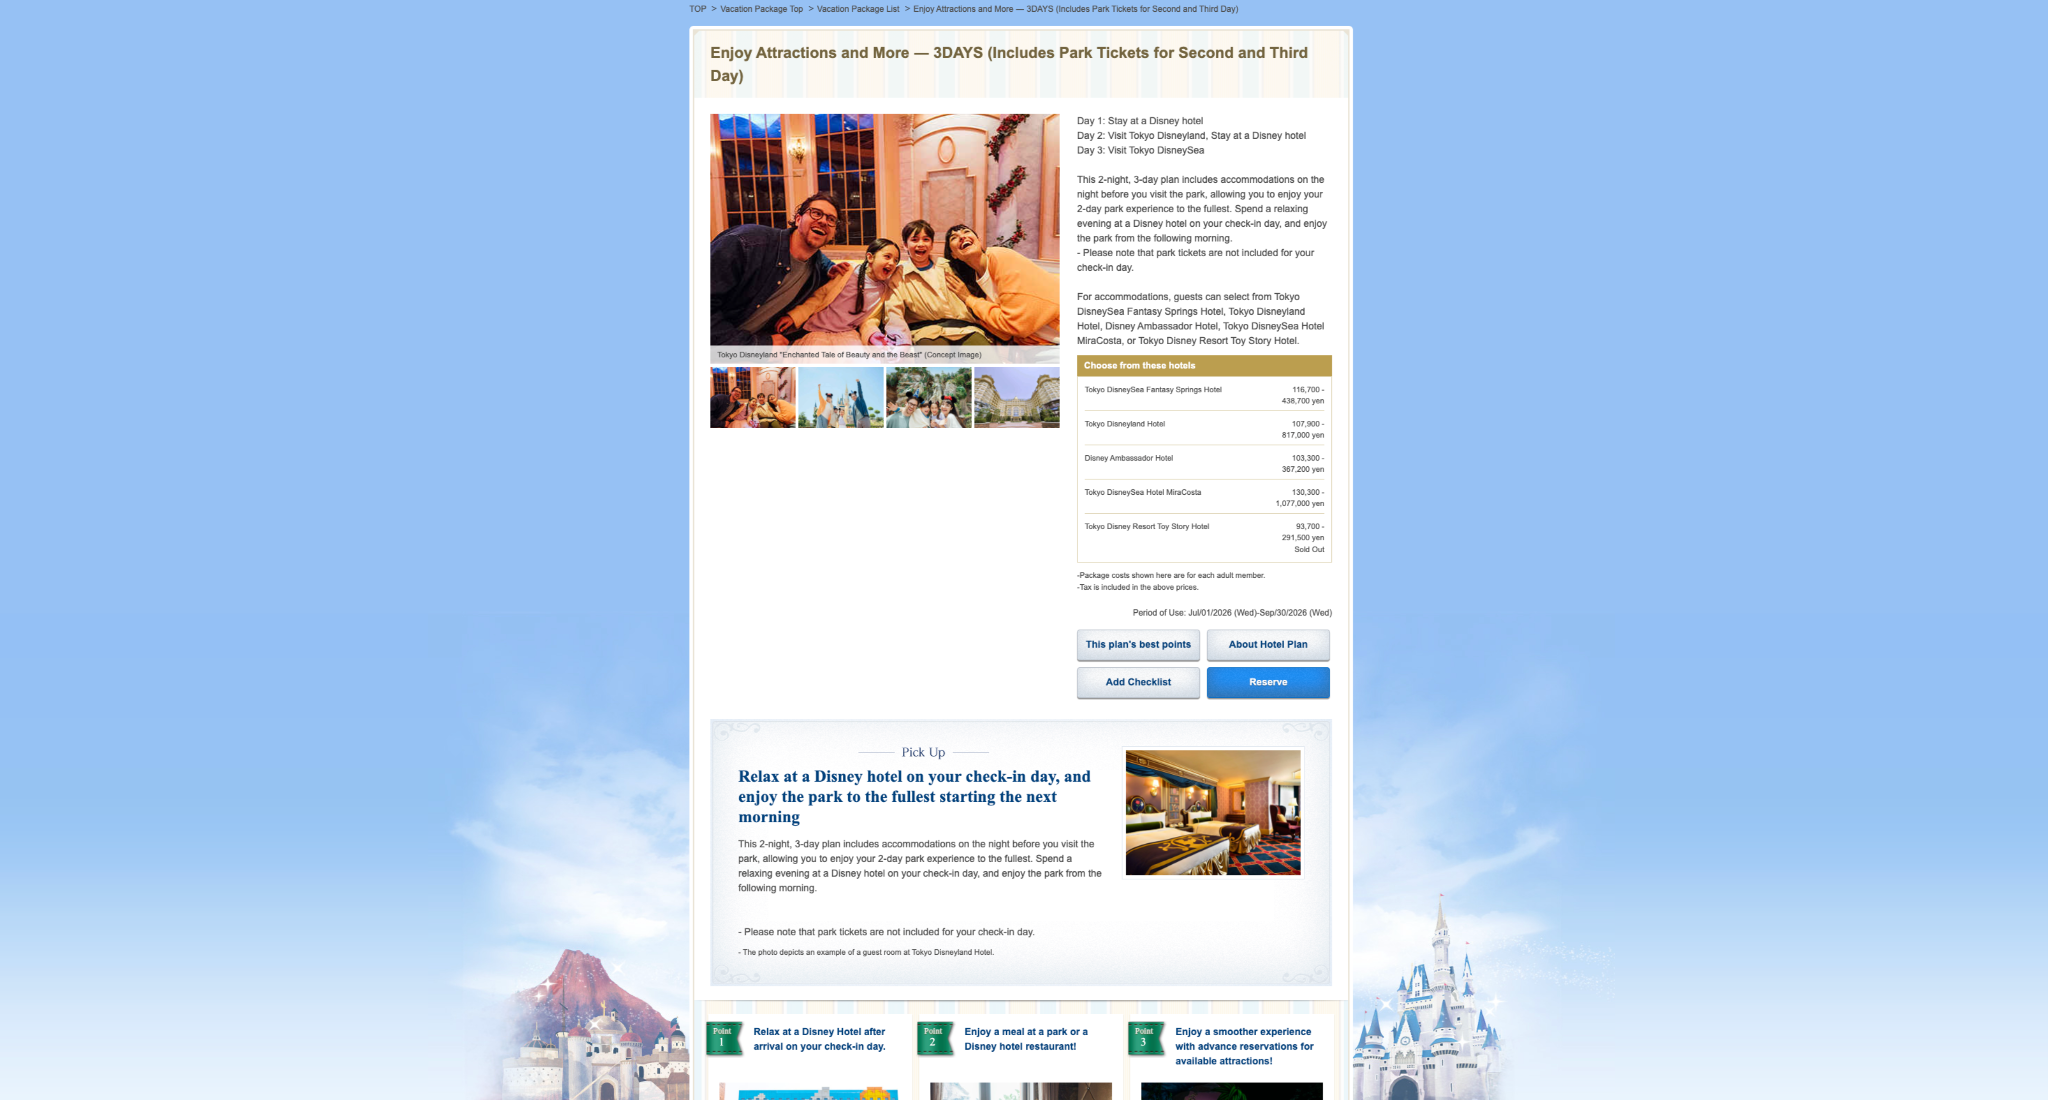
After selecting your Vacation Package, you’ll be taken to a page with all the details of that specific package.
This includes:
what’s included
your itinerary
and how your park days are structured
At this point, you’ll likely already know which package you want. Since you don’t have much time to go through everything in detail during booking, you can simply click the blue button (“Reserve”) to continue.
Personal tip:
I really recommend going through this page in advance. Do a test run on a random date and take the time to read everything properly. This page is actually quite important, as it shows exactly what your itinerary will look like for that specific package. You can click through the different package options, compare what’s included, and decide which one works best for you — so you don’t have to figure it out on booking day.
Step 6. Select your hotel + room
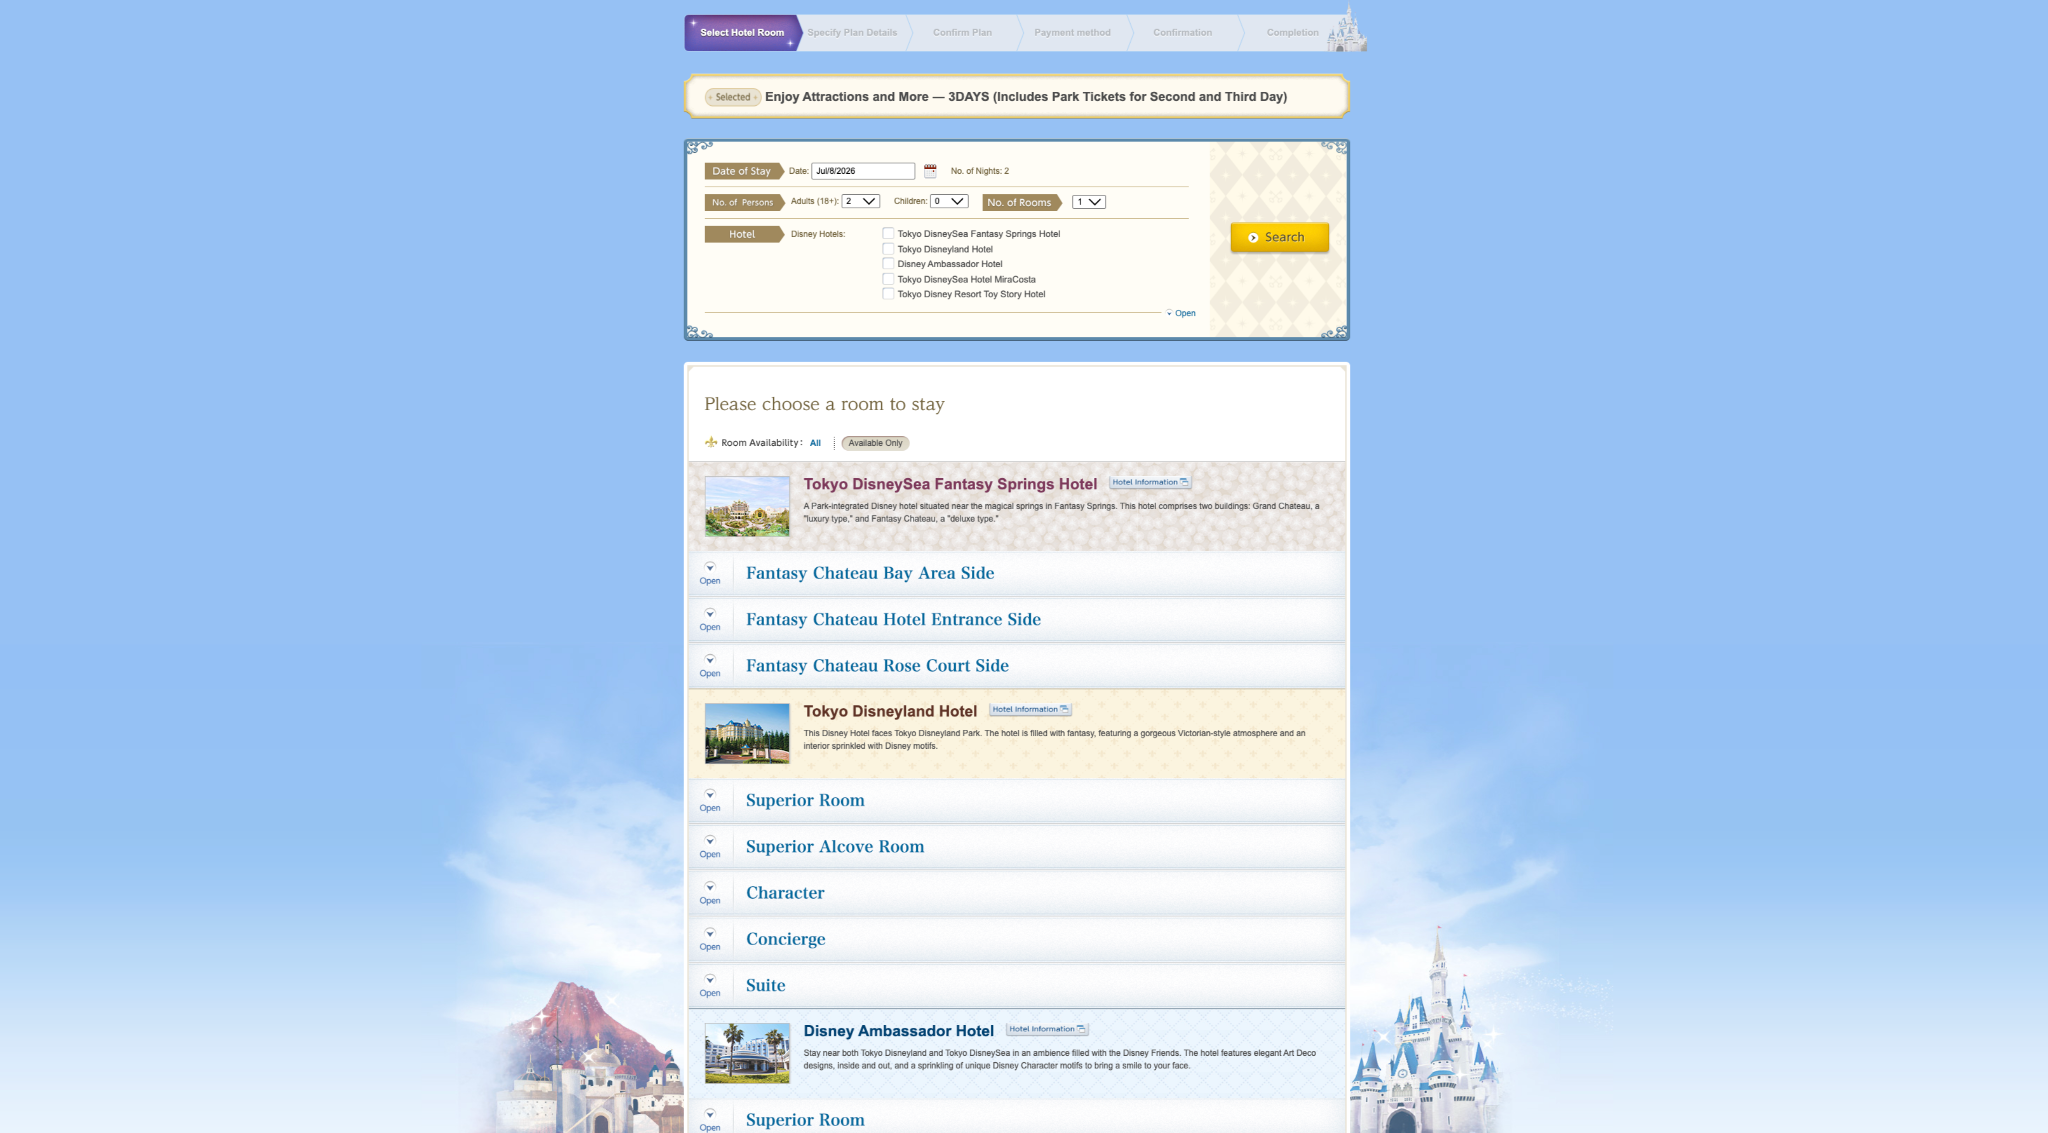
This is where things can get competitive.
On this page, you’ll see the available Disney hotels for your selected package and dates. You can use the selection bar at the top of the page to jump directly to a specific hotel, but I personally just scrolled down as I felt it was quicker. This is also your moment to quickly double-check that everything you entered earlier is correct — your dates, number of nights, and number of people. You’ll also see the name of the Vacation Package you selected at the top of the page, so take a split second to confirm everything looks right before continuing.
From here, you’ll first choose your hotel, and then your room type. If you’ve prepared in advance, you should already know exactly what you’re looking for — as well as your backup option. Availability can change quickly at this stage, and some rooms may already be gone by the time you get here.
Once you’ve selected your hotel and the room you’d like, click the blue button under the room details that says “Reserve.”
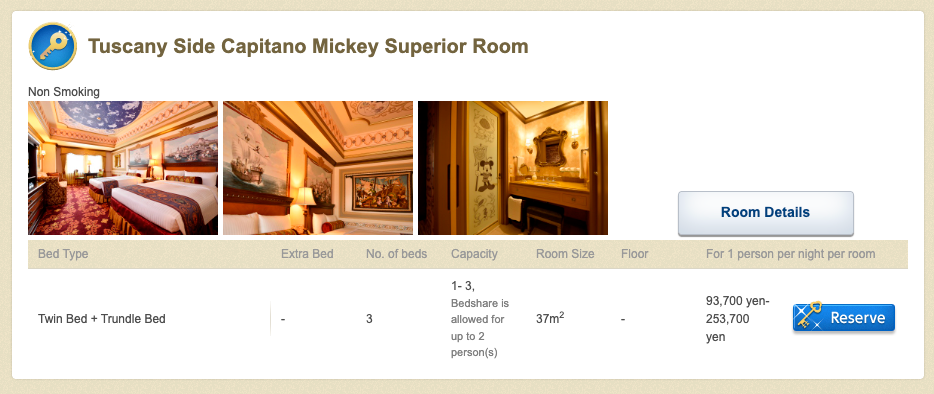
Personal tip:
I really wanted to book the MiraCosta balcony rooms, but by the time I got in, they were already sold out — so I opted for the Harbor View rooms instead. These are some of the most competitive rooms, so if you’re aiming for something similar, you really do need to move quickly (more quickly than I did, apparently).
Step 7. Agree to the terms and conditions
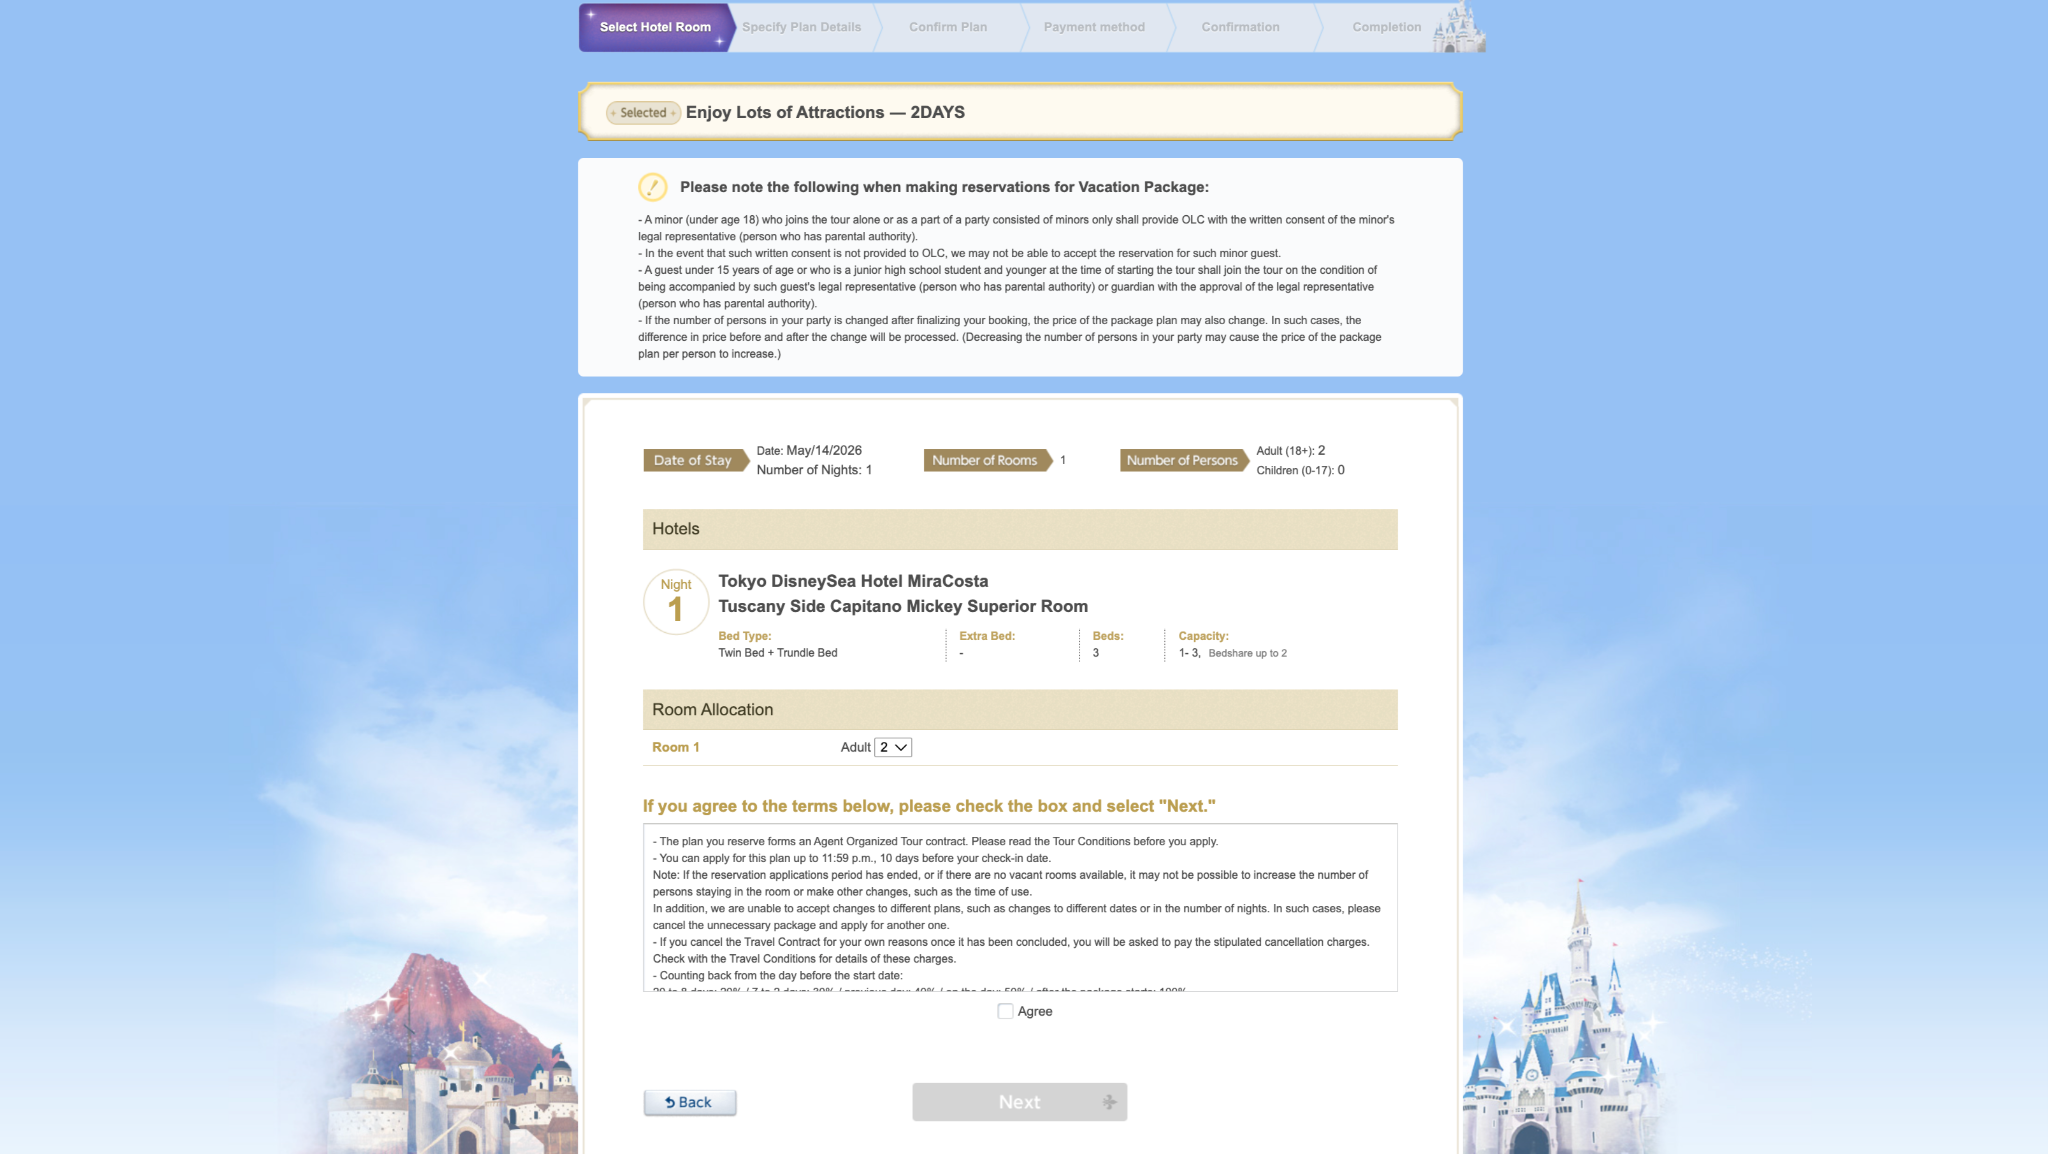
Before continuing, you’ll be asked to review and agree to the terms and conditions.
This page mainly covers things like:
cancellation policies
what changes you can (and can’t) make after booking
and general booking conditions
For example, once your booking is confirmed, changes like switching dates or package types are usually not possible — you would need to cancel and rebook instead. There are also cancellation fees that increase the closer you get to your travel date.
Once you’re ready, “Tick” the box to agree and click “Next” to continue.
Personal tip:
I’d recommend reading through this properly during your test run, rather than on booking day. There’s quite a bit of information here, especially around cancellation fees and booking restrictions. It’s good to understand this in advance, so you don’t feel rushed when you’re actually booking.
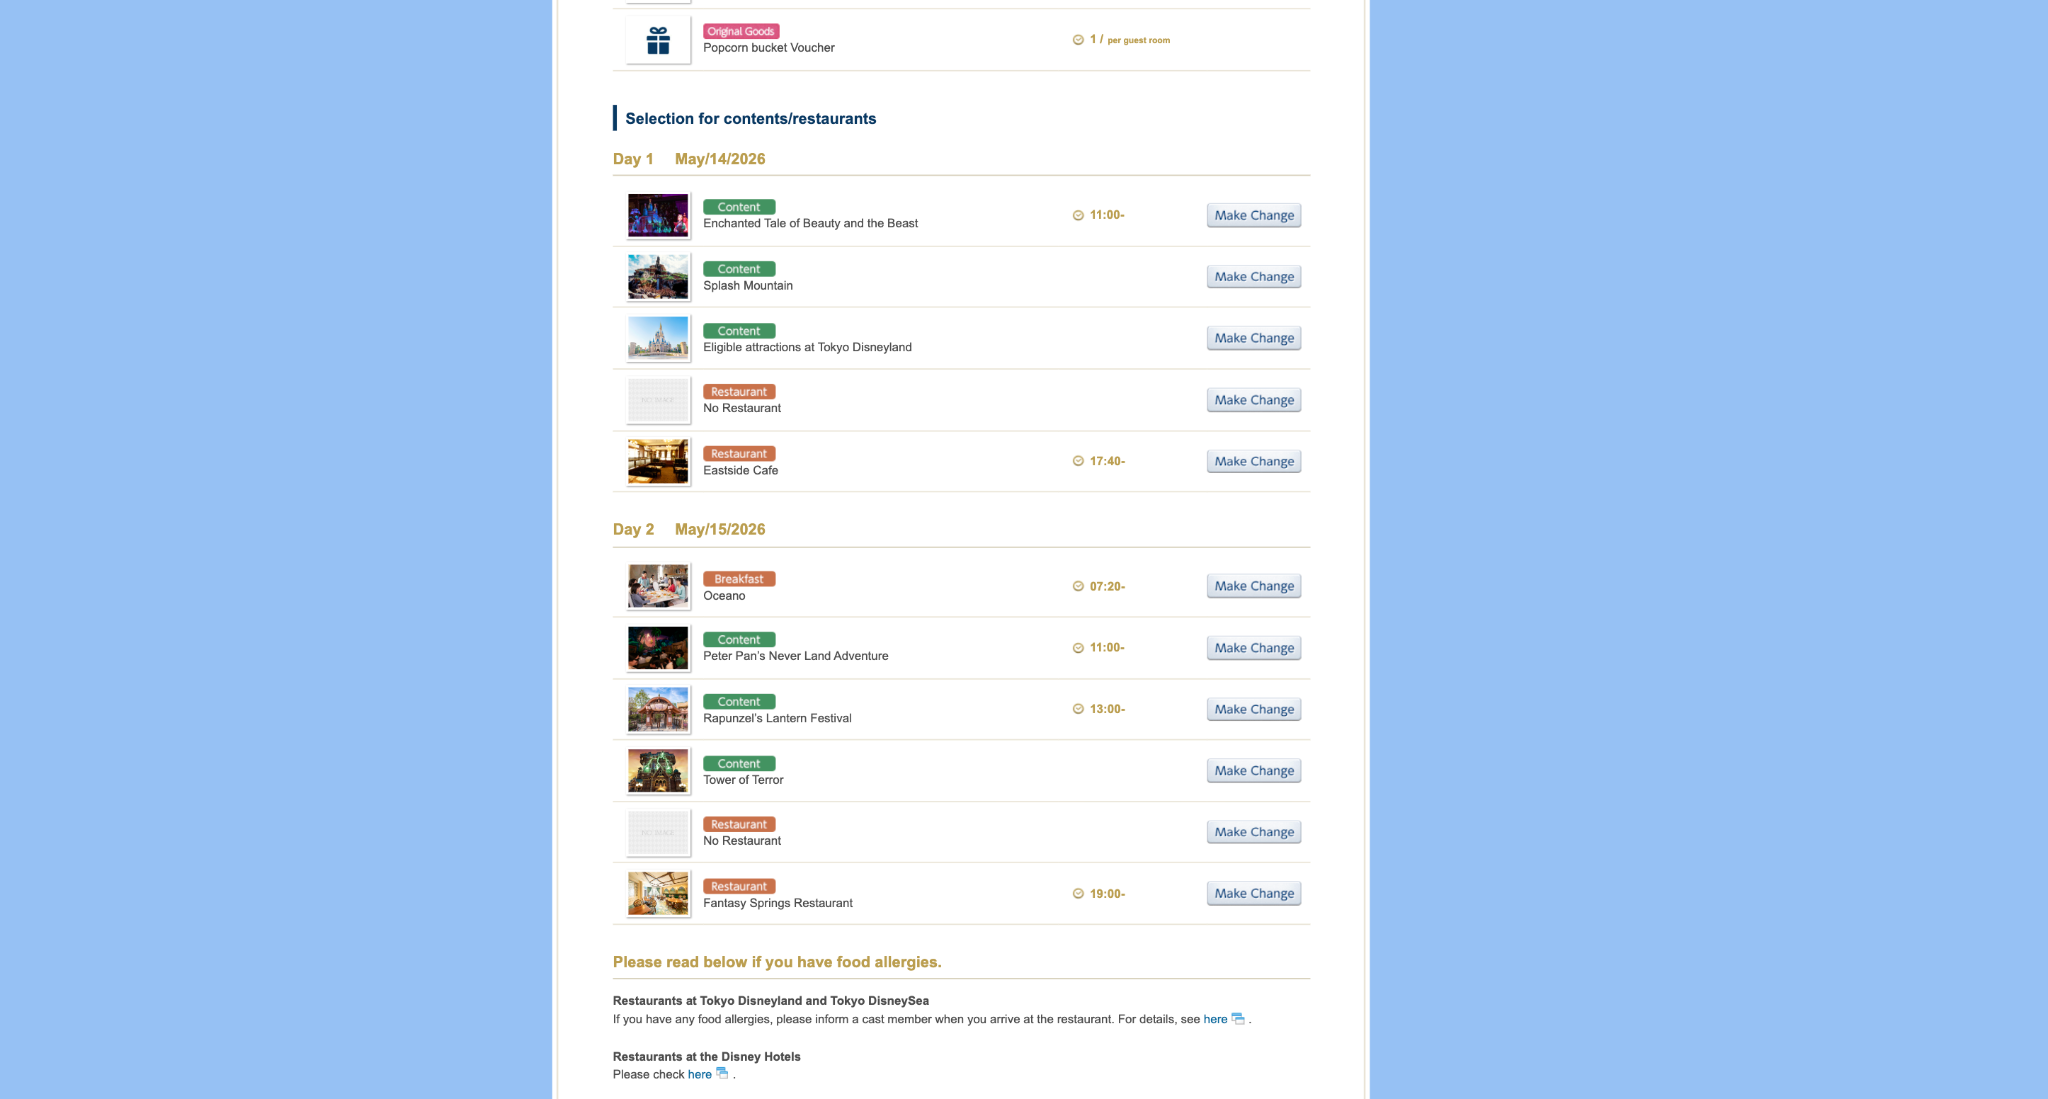
Step 8. Build your Vacation Package (rides & dining)
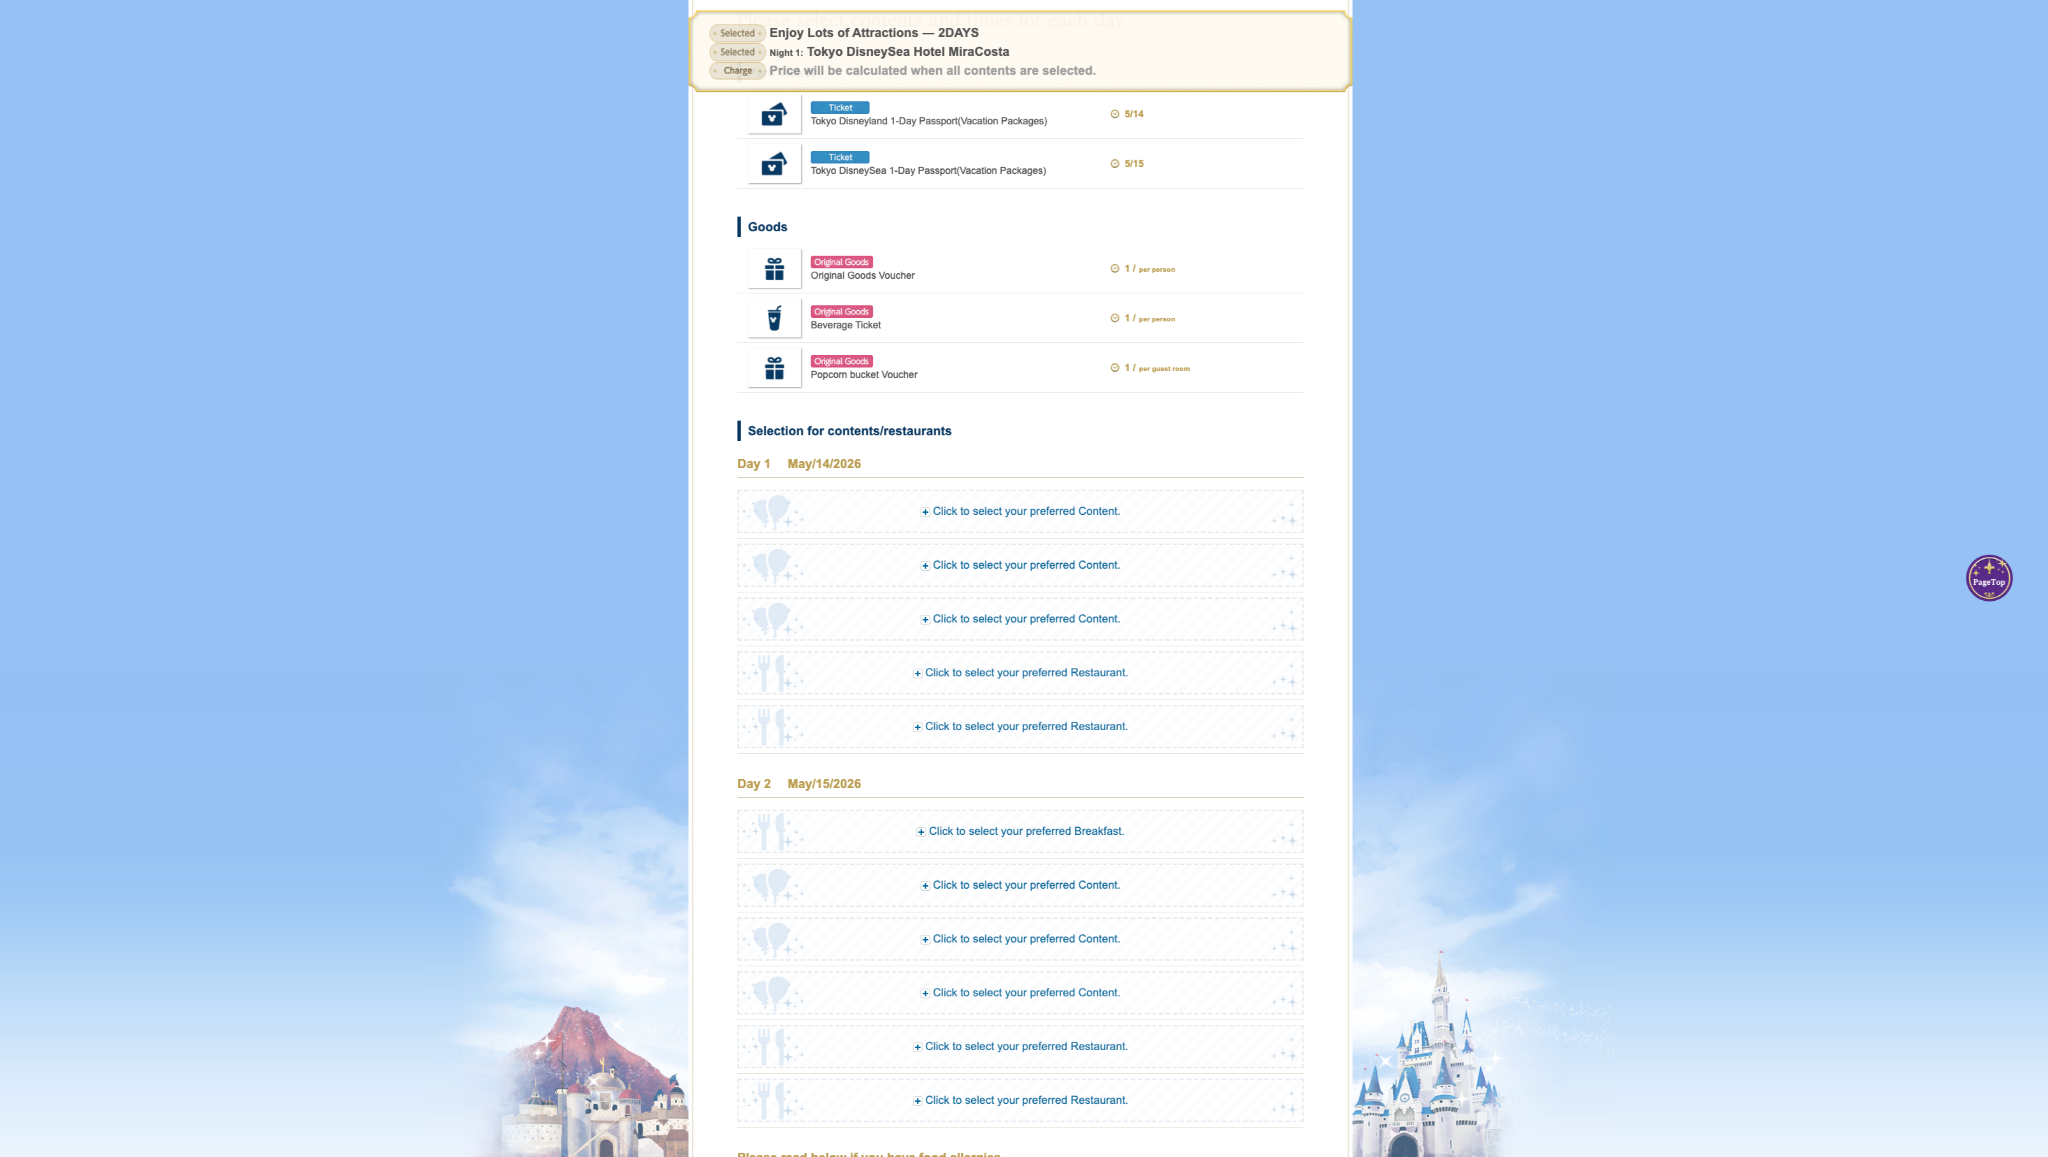
This is the step where you’ll spend the most time — and where things can feel a bit overwhelming at first. At the top of the page, you’ll see everything that’s already included in your Vacation Package, such as your popcorn bucket voucher, beverage voucher, and original goods voucher (a small gift you can choose).
As you scroll down, you’ll start building your itinerary by selecting the “content” for each day.
For each day, you’ll select:
breakfast time
3 rides
2 restaurant options
For some rides, you’ll also need to select a time slot. You’ll usually be able to enter the attraction within a one-hour window after your selected time. Each time you select one of the options, a pop-up will appear where you can make your choice.
Choosing a restaurant is optional, but you’ll still need to actively select “No restaurant” (this is the first option at the top of the pop-up) if you don’t want to make a reservation. You can make reservations for restaurants both inside the park your ticket is for, as well as at the Disney hotels. Do keep in mind that restaurants can fill up quite quickly.
Once you’ve completed one day, you’ll follow the same process for the next day — and again if your package includes three days.
Personal tip:
(And yes, I’ll say it again — because it really matters here.) This is the moment where having everything written down makes a huge difference. When I first saw this page during my test runs, I took my time to go through all the options — and I ended up getting kicked out a couple of times. That’s fine during a trial run, but it’s definitely something you want to avoid on booking day.
Also, keep in mind that this step can take a bit of time. When you see a loading screen after making a selection, don’t panic — that’s completely normal. Just wait for it to load and avoid refreshing the page. Having a list next to you means you can simply follow your plan and move through each step without hesitation.
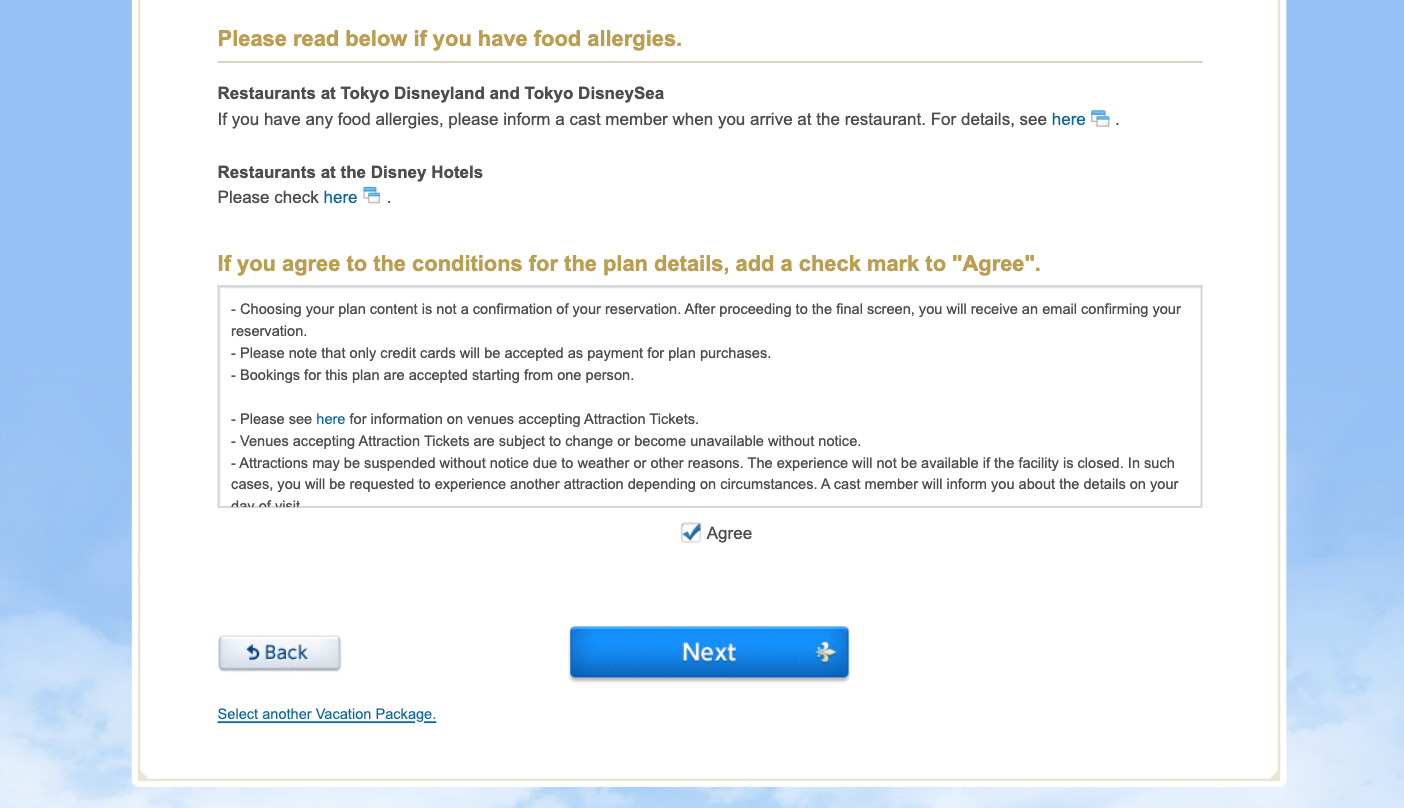
Step 9. Agree to the Terms & Conditions
At the bottom of the page, you’ll find a final box with terms and conditions that you’ll need to agree to before continuing.
This section mainly covers things like:
how your reservation is confirmed (only after the final step)
payment (credit card only)
general park and attraction conditions
and what happens if attractions or experiences are unavailable
For example, if a ride is closed on the day of your visit, you may be asked to choose an alternative. It also outlines things like park operations, hotel benefits, and what’s included in your package.
Once you’re ready, tick the “Agree” box and click “Next” to move on to the final booking and payment page.
Step 10. Log in or create a Disney account
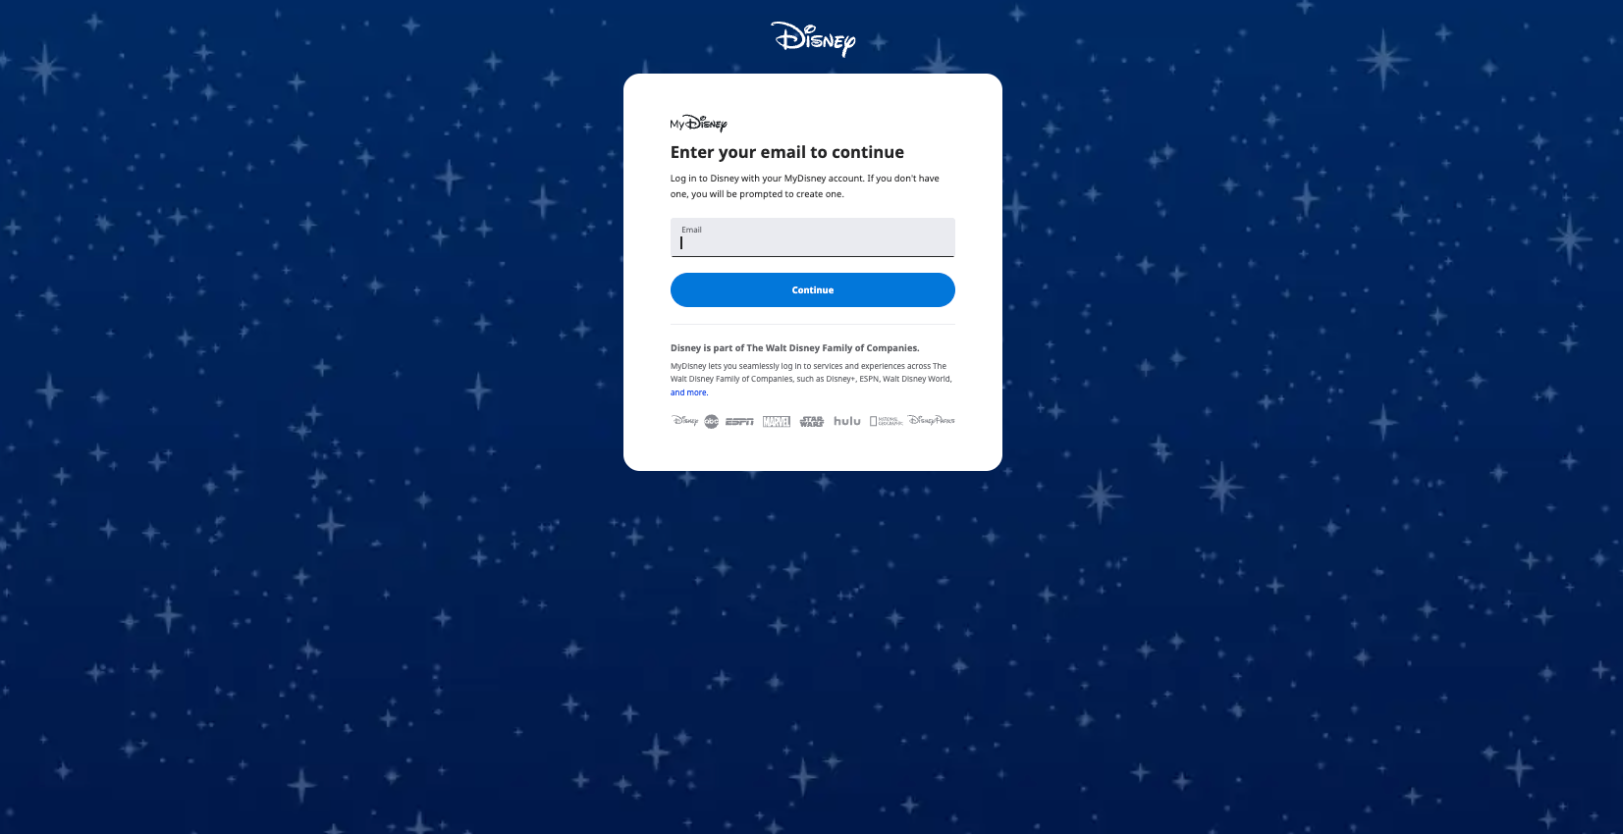
Next, you’ll be asked to log in to your Disney account — or create one if you don’t have one yet.
I was able to log in using the same Disney account I’ve used for my bookings at Disneyland Paris, so it’s definitely worth checking in advance if your existing account works here as well. If you don’t have an account yet, I’d recommend creating one beforehand so you can log in quickly during the booking process.
Personal tip:
Make sure your login details are saved or easily accessible. The last thing you want at this stage is to forget your password or have to reset it while you’re in the middle of booking.
Step 11. Review your booking and continue
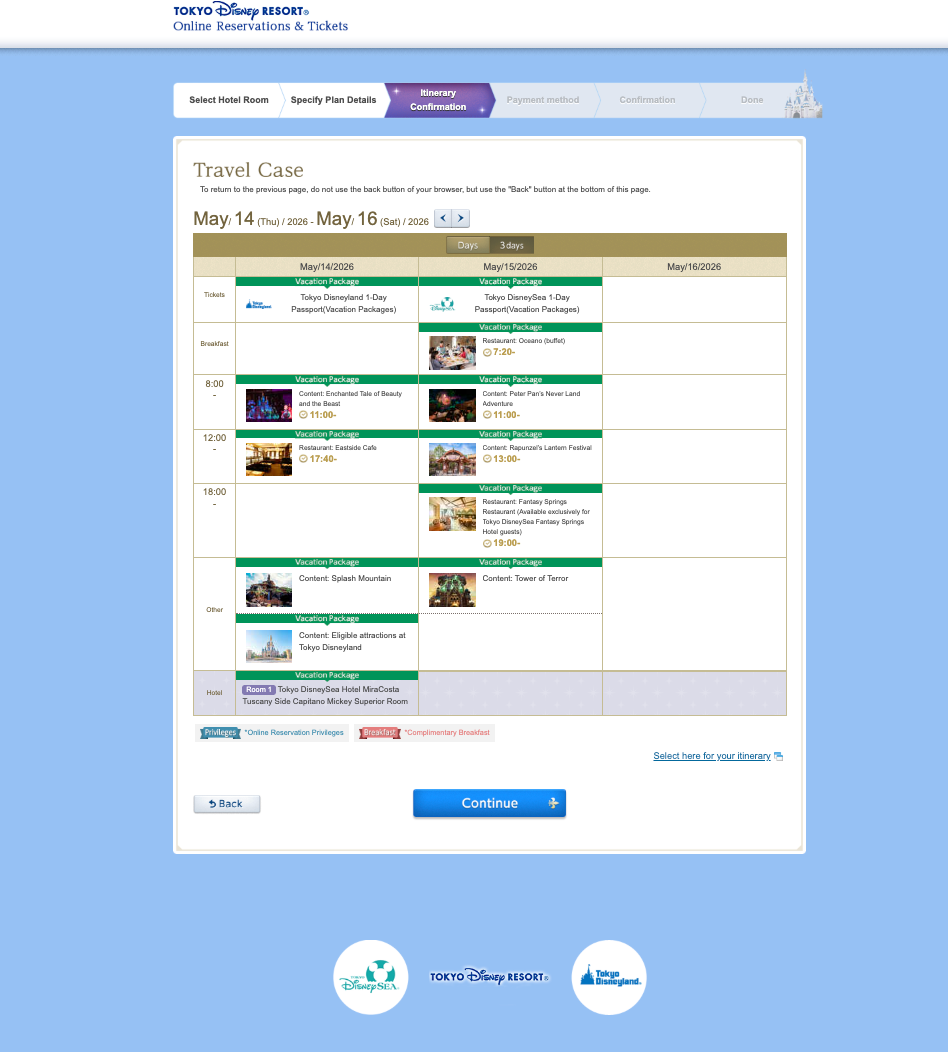
In the final step, you’ll see an overview of your full itinerary and everything you’ve selected.
This includes:
the dates
hotel and room
rides and time slots
dining options
You can quickly scan through this to make sure everything looks correct. You don’t need to go through it in detail — you’ll also receive a full overview by email once your booking is confirmed.
If everything looks good, simply click “Continue” to move on to payment.
12. Payment and confirmation
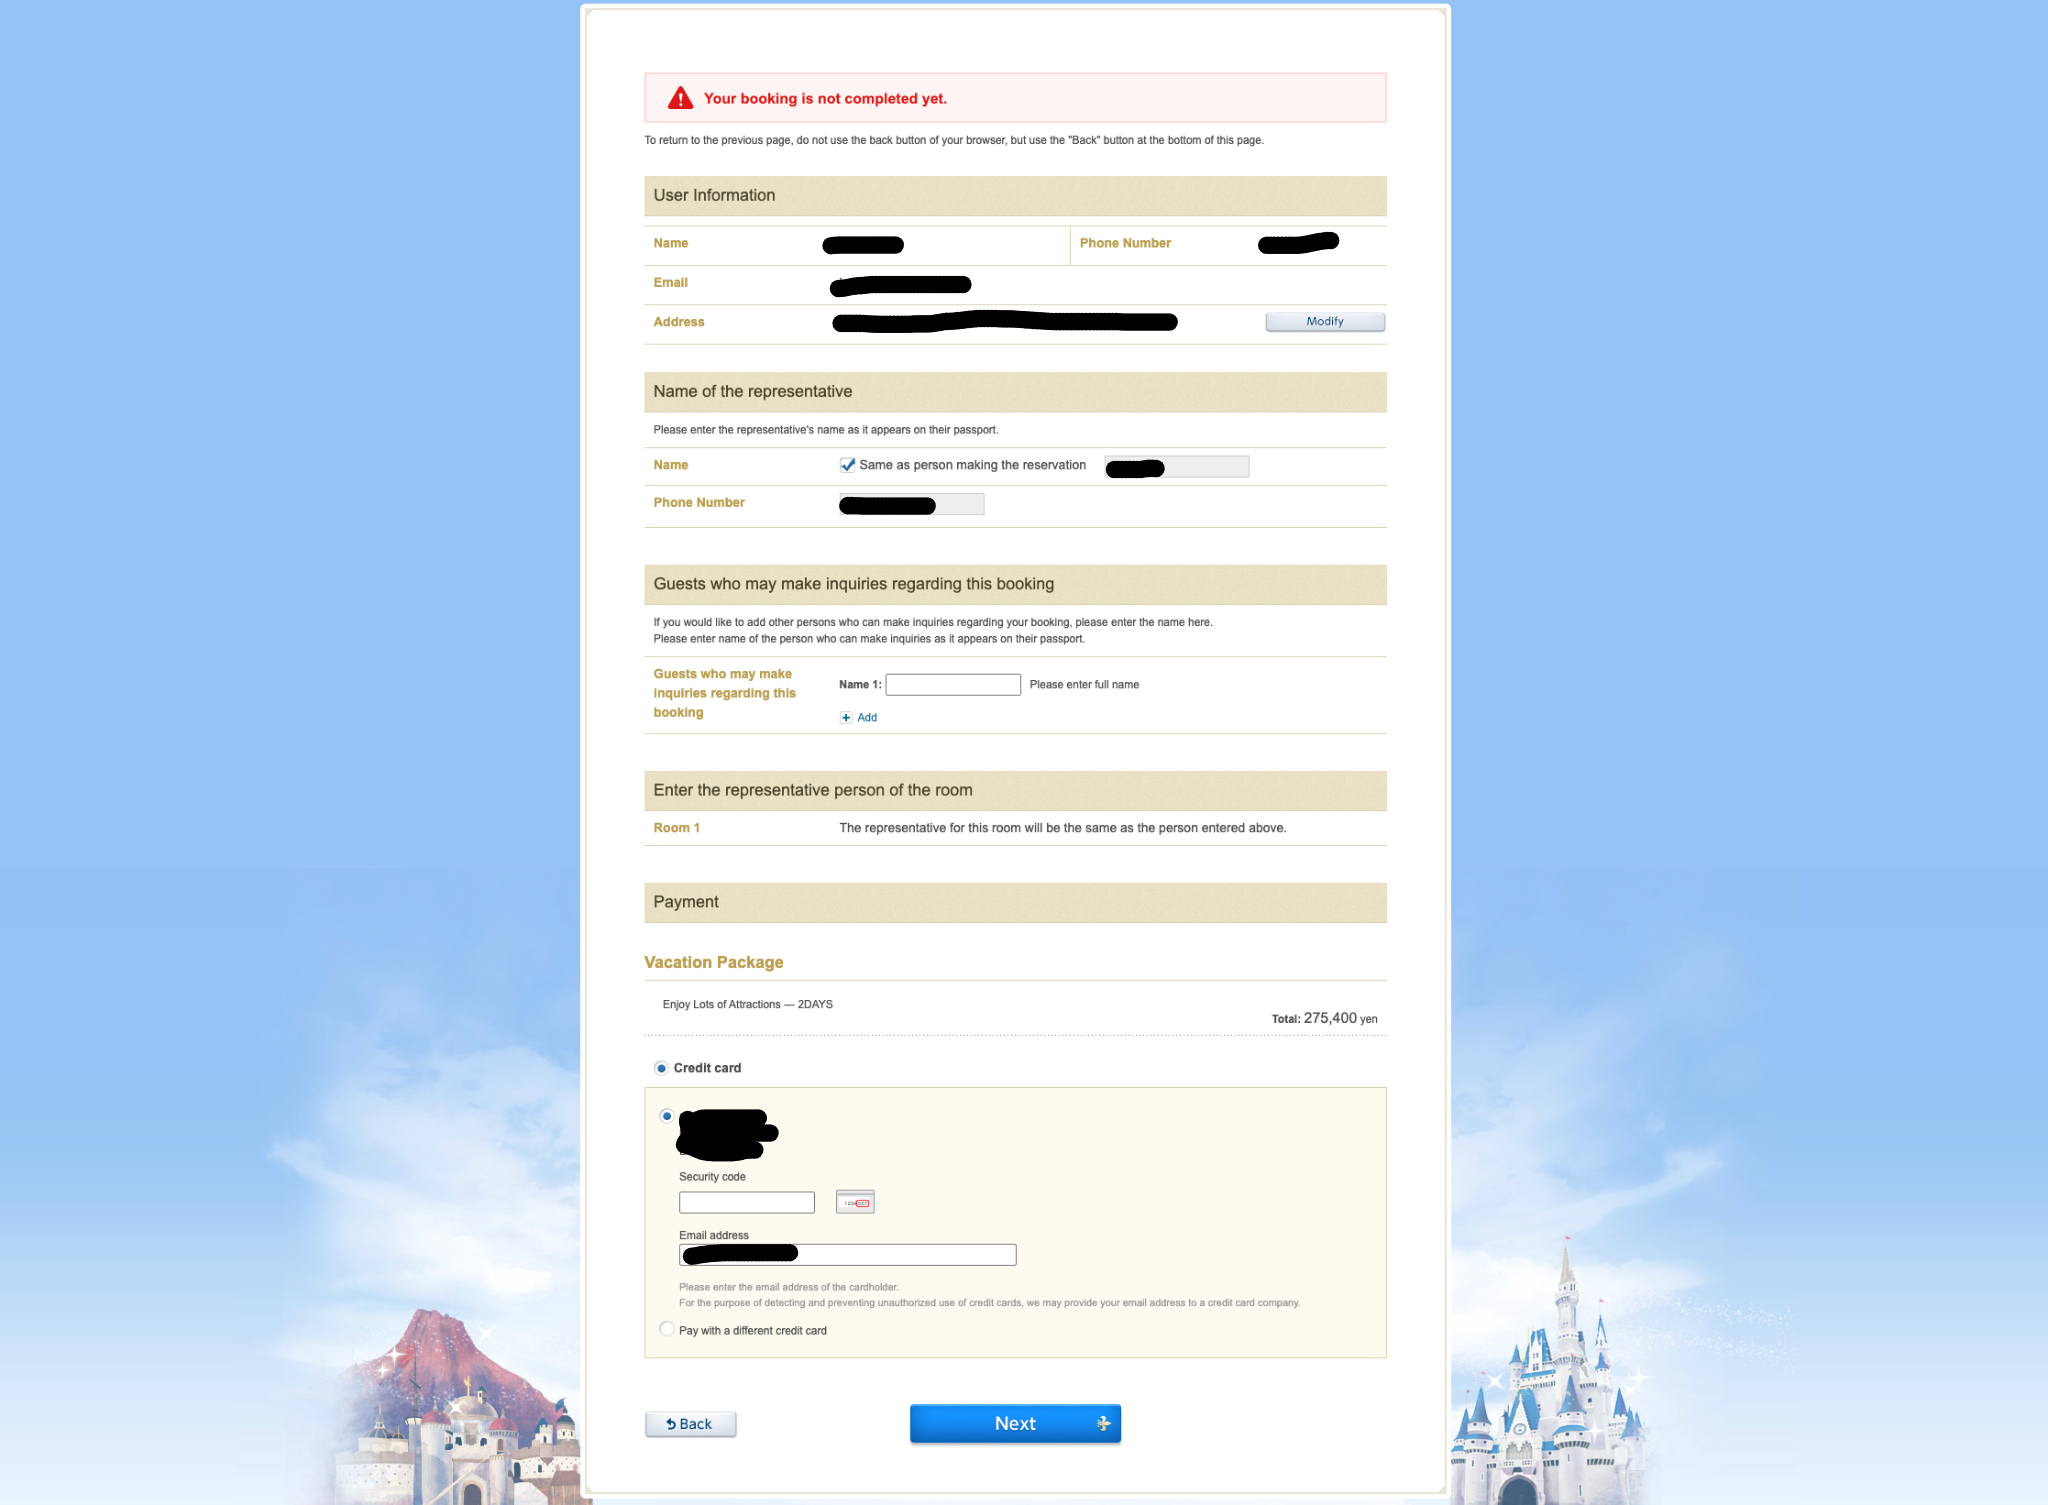
In the final step, you’ll complete your payment. If you’ve already set up your Disney account, most of your details will likely be prefilled, so there’s not much to fill in here. Just make sure you have your credit card ready, enter your payment details, and click “Next.” You’ll then be redirected to the payment page, and once everything is completed, your booking will be confirmed.
You’ll receive an email with your booking confirmation and itinerary.
Booking a Tokyo Disney Vacation Package can feel like a lot at first, but once you know what to expect, it becomes much more manageable. The key is preparation — knowing what you want, having everything ready, and moving through the steps with confidence.
Good luck with your booking! If anything is unclear, feel free to reach out — I’m always happy to help.
More Disney
Looking for the collectible champagne flutes in Disneyland Paris? From the iconic gold flute on Main Street, U.S.A. to the new blue Frozen version near World of Frozen, here's where to find all three champagne flutes, how much they cost, and where to buy them.